前提:
本文介绍两种邮件发送,一个是网易163邮箱,另一个是网易企业163邮箱
项目地址:https://github.com/su1573/mail-send
一、登录邮箱设置
网易163邮箱
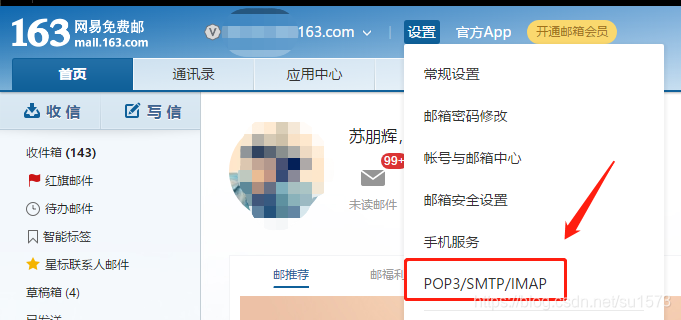
1、登录个人163邮箱,如图选中POP3/SMTP/IMAP
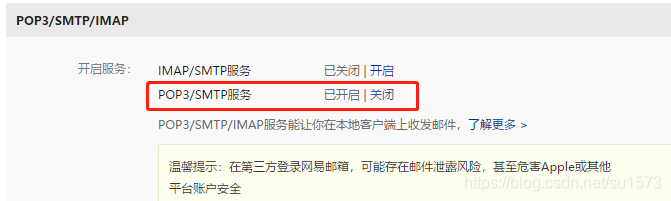
2、开启POP3/SMTP服务,根据提示获取授权码,授权要保存好,一会儿要用到
网易企业163邮箱
这个我这里是没有上面的POP3/SMTP服务,在代码中用的直接是登录邮箱密码
二、jar包引用
<dependency>
<groupId>javax.activation</groupId>
<artifactId>activation</artifactId>
<version>1.1</version>
</dependency>
<dependency>
<groupId>javax.mail</groupId>
<artifactId>mail</artifactId>
<version>1.4.5</version>
</dependency>
<dependency>
<groupId>org.springframework</groupId>
<artifactId>spring-context-support</artifactId>
<version>5.2.11.RELEASE</version>
</dependency>
- 1
- 2
- 3
- 4
- 5
- 6
- 7
- 8
- 9
- 10
- 11
- 12
- 13
- 14
- 15
- 16
- 17
三、代码演示
package com.su.mailsend.service;
import com.sun.mail.util.MailSSLSocketFactory;
import org.springframework.mail.javamail.JavaMailSenderImpl;
import org.springframework.mail.javamail.MimeMessageHelper;
import javax.activation.DataHandler;
import javax.activation.FileDataSource;
import javax.mail.*;
import javax.mail.internet.*;
import java.io.File;
import java.util.Date;
import java.util.Properties;
public class MailStmpSend {
private void sendMail(String to, String text, String title) throws Exception {
String from = "xxx@163.com";
String user = "xxx@163.com";
String password = "VHXCLTZDEOFFWNSA";
Properties props = new Properties();
props.setProperty("mail.smtp.host", "smtp.163.com");
props.put("mail.smtp.host", "smtp.163.com");
props.put("mail.smtp.auth", "true");
Session session = Session.getDefaultInstance(props);
session.setDebug(true);
try {
MimeMessage message = new MimeMessage(session);
message.setFrom(new InternetAddress(from));
message.addRecipient(Message.RecipientType.TO, new InternetAddress(to));
message.addRecipient(Message.RecipientType.CC, new InternetAddress(to));
message.setSubject(title);
MimeMultipart multipart = new MimeMultipart();
MimeBodyPart contentPart = new MimeBodyPart();
contentPart.setContent(text, "text/html;charset=utf-8");
multipart.addBodyPart(contentPart);
String attPath = "D:\data\ftpUpload\2020\12\10\盖章指令文件.zip";
MimeBodyPart attachment = new MimeBodyPart();
DataHandler dh = new DataHandler(new FileDataSource(attPath));
attachment.setDataHandler(dh);
attachment.setFileName(MimeUtility.encodeText(dh.getName()));
multipart.addBodyPart(attachment);
multipart.setSubType("mixed");
message.setContent(multipart);
message.setSentDate(new Date());
message.saveChanges();
Transport transport = session.getTransport("smtp");
transport.connect("smtp.163.com", user, password);
transport.sendMessage(message, message.getAllRecipients());
transport.close();
} catch (MessagingException e) {
e.printStackTrace();
}
}
public void sendHtmlMail() {
try {
String from = "职业年金受托";
String to = "xxx@163.com";
String copy = "xxx@163.com";
String subject = "测试邮件";
String text = "你好,这是一封测试邮件,无需回复。";
String host = "smtphz.qiye.163.com";
String username = "xxx@su-abc.com.cn";
String password = "123456";
Properties prop = new Properties();
prop.setProperty("mail.smtp.auth", "true");
prop.setProperty("mail.smtp.timeout", "994");
MailSSLSocketFactory sf = new MailSSLSocketFactory();
sf.setTrustAllHosts(true);
prop.put("mail.smtp.ssl.enable", "true");
prop.put("mail.smtp.ssl.socketFactory", sf);
JavaMailSenderImpl javaMailSend = new JavaMailSenderImpl();
MimeMessage message = javaMailSend.createMimeMessage();
MimeMessageHelper messageHelper = new MimeMessageHelper(message, true, "utf-8");
String nick = MimeUtility.encodeText(from);
messageHelper.setFrom(new InternetAddress(nick + " <" + username + ">"));
messageHelper.setTo(to);
messageHelper.setCc(copy);
messageHelper.setSubject(subject);
messageHelper.setText(text, true);
File file = new File("D:\data\ftpUpload\2020\12\10\盖章指令文件.zip");
messageHelper.addAttachment(MimeUtility.encodeWord(file.getName()), file);
javaMailSend.setHost(host);
javaMailSend.setUsername(username);
javaMailSend.setPassword(password);
javaMailSend.setJavaMailProperties(prop);
javaMailSend.send(message);
} catch (Exception e) {
e.printStackTrace();
}
}
public static void main(String[] args) {
try {
MailStmpSend ds = new MailStmpSend();
ds.sendHtmlMail();
} catch (Exception e) {
e.printStackTrace();
}
}
}
- 1
- 2
- 3
- 4
- 5
- 6
- 7
- 8
- 9
- 10
- 11
- 12
- 13
- 14
- 15
- 16
- 17
- 18
- 19
- 20
- 21
- 22
- 23
- 24
- 25
- 26
- 27
- 28
- 29
- 30
- 31
- 32
- 33
- 34
- 35
- 36
- 37
- 38
- 39
- 40
- 41
- 42
- 43
- 44
- 45
- 46
- 47
- 48
- 49
- 50
- 51
- 52
- 53
- 54
- 55
- 56
- 57
- 58
- 59
- 60
- 61
- 62
- 63
- 64
- 65
- 66
- 67
- 68
- 69
- 70
- 71
- 72
- 73
- 74
- 75
- 76
- 77
- 78
- 79
- 80
- 81
- 82
- 83
- 84
- 85
- 86
- 87
- 88
- 89
- 90
- 91
- 92
- 93
- 94
- 95
- 96
- 97
- 98
- 99
- 100
- 101
- 102
- 103
- 104
- 105
- 106
- 107
- 108
- 109
- 110
- 111
- 112
- 113
- 114
- 115
- 116
- 117
- 118
- 119
- 120
- 121
- 122
- 123
- 124
- 125
- 126
- 127
- 128
- 129
- 130
- 131
- 132
- 133
- 134
- 135
- 136
- 137
- 138
- 139
- 140
- 141
- 142
- 143
- 144
- 145
- 146
- 147
- 148
- 149
- 150
- 151
- 152
- 153
- 154
- 155
- 156
- 157
- 158
- 159
- 160
- 161
- 162
- 163
- 164
- 165
- 166
- 167
- 168
- 169
- 170
- 171
- 172
- 173
- 174
- 175
- 176
- 177
- 178
- 179
- 180
- 181
- 182
- 183
- 184
- 185
- 186
- 187
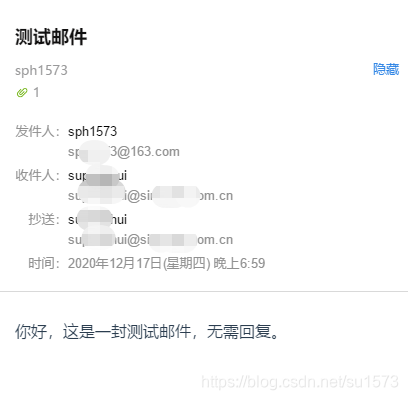
四、效果展示
网易163邮箱发送邮件:
因篇幅问题,附件在最下面,这里就不截了
网易企业163邮箱发送邮件:
